Showing posts with label Con Prep. Show all posts
Showing posts with label Con Prep. Show all posts
Friday, November 29, 2013
Chicago TARDIS: My Schedule
Hey everyone! Here is my schedule for tomorrow (Saturday) at Chicago TARDIS. I'll be spending most of the morning in registration and waiting for my interview, so things will really kick off for me at noon.
12:00 PM
My first panel! Come to the Cypress room, where we'll be talking about SyFy's Heroes of Cosplay.
1:00 PM
Going to the Lilac room to see the panel "Fangirls Are Real Fans, Too."
2:00 PM
Speaking on my second panel, "So You Want to Cosplay" in the Cypress room.
3:00 PM
I'm going to check out the dealers room and the gaming room.
4:00 PM
I may go to the "Moffat's Girls" panel in the Lilac Room, or I may just wander around.
5:00 PM
"Saturday with Freema" panel in the Grand Ballroom.
6:00-7:30 PM
Break. Gotta find somewhere to eat!
7:30 PM
Masquerade! The best part of the day!
I have Geekphoria stickers to give away to people who come say "hi!." And also, as a special surprise, I will have a K-9 necklace and a Tardis necklace from my Etsy shop to give away to the first two people (one each) who come introduce themselves at Chicago TARDIS.
Tuesday, June 18, 2013
Con Prep: Painting Props
The costume I have planned for the Friday of Chicago Comic Con requires a shotgun. I bought said toy shotgun at my local Gordman's the other day (yeah, who'dve thought?), and today I went to work making the $12.00 toy look...well...better.
Here's a picture of the original end of the gun. You can see the wood-grain texture, but only barely. It looks like a cheap toy.
Here's the shotgun from further away. Plastic-y!
I brought out the wood grain and darkened the plastic using the technique highlighted by the amazing Jen Yates in this blog entry (btw, if you don't read Epbot, you're missing out on EVERYTHING). Jen brings out the texture by painting the plastic with a darker shade of the color, and then wiping the paint off. This leaves the dark pain in the nooks and crannies of the plastic, and makes the thing look great.
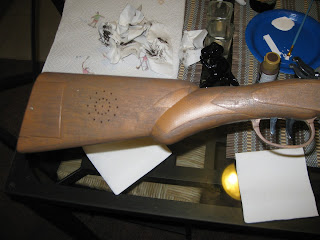
I used a brown color called "Dark Chocolate"--but it ended up being too light, so I darkened it with a little bit of black. I also let some spots be more worn and others have a darker build-up, in order to try to replicate the look of an older, often-handled gun. This picture is immediately following the work on the wood-grain. The light spot is an inlay.
Once I finished with the "wooden" parts of the gun, I pained the inlay gold (I know, this gun is super fancy).
So, here are the "after" pictures! What do you think?
Here's a hint as to what my costume is going to be! If you have a guess, leave a comment! :)
Here's a picture of the original end of the gun. You can see the wood-grain texture, but only barely. It looks like a cheap toy.
Here's the shotgun from further away. Plastic-y!
I brought out the wood grain and darkened the plastic using the technique highlighted by the amazing Jen Yates in this blog entry (btw, if you don't read Epbot, you're missing out on EVERYTHING). Jen brings out the texture by painting the plastic with a darker shade of the color, and then wiping the paint off. This leaves the dark pain in the nooks and crannies of the plastic, and makes the thing look great.
I used a brown color called "Dark Chocolate"--but it ended up being too light, so I darkened it with a little bit of black. I also let some spots be more worn and others have a darker build-up, in order to try to replicate the look of an older, often-handled gun. This picture is immediately following the work on the wood-grain. The light spot is an inlay.
Once I finished with the "wooden" parts of the gun, I pained the inlay gold (I know, this gun is super fancy).
So, here are the "after" pictures! What do you think?
 |
| Close-up. |
 |
| Further away. |
 |
| Here, you can see the smooth spots I added where you'd hold the gun. Also, all the essential crafting supplies (read: hard cider) |
 |
| Hint: Think "video game" |
Subscribe to:
Posts (Atom)


