Showing posts with label cosplay. Show all posts

Thursday, January 9, 2014

New Year Geek Tips: Planning Ahead for Con Season

January means a new year, and a new year means that convention season will be here before we know it (and, in some areas, is still going strong). Cons don't really start in Chicago until C2E2 in April, but because I'm a poor graduate student, I do like to (and need to) plan ahead in order to know exactly when I need to have the cash to play for badges/registration, hotels, and travel. My plans aren't 100% for later in the year (I want to go to Dragon Con, but I need to figure out if it's logistically possible for me), but here's a brief overview of what I'm planning for 2014 with an approximate idea of costs. Making a list of the conventions, dates, locations, and costumes for the year ahead helps me to stay organized for the year--and it could help you, too, which is why I'm sharing this.

I'm also laying out the costume ideas I have for each con, because my major "resolution" in 2014 is to expand my cosplay portfolio.


Con #1: C2E2

Where: McCormick Convention Center, Chicago, IL
Dates: April 25(?), 26, 27
I teach until 3pm on Fridays, so I'm not sure if I can make it to the city before the end of festivities on Friday afternoon. Still, though, I purchased a 3-Day pass ($60 if purchased before the convention). I also reserved a hotel room for Saturday night at the con hotel, but the costs of that will be shared and be $70 at the highest. Gas up to Chicago from school is about $30.
Base Cost: $160

Cosplay Ideas

1. Rogue from X-Men: Evolution

2. Enchantress from Justice League Dark (If my brother doesn't come)

3. Death from The Sandman (If my brother does come)


Con #2: Anime Central

Where: Hyatt Regency O'Hare, Rosemont, IL
Dates: May 16th-18th, though I'm not 100% on which dates I will attend due to final exams.
I haven't purchased anything here, but weekend passes are currently $53. I won't get a hotel room, most likely, unless several people want to go in on it with me (which is a possibility). I'd expect to spend around $50 on a room, then. Gas to Chicago is about $30, but since we're going on a family vacation a couple days later, I won't count it as a con cost since I'll be there already.
Base Cost: $53

Cosplay Ideas

1. Aqua from Kingdom Hearts


Con #3, Possibility 1: Chicago Comic Con

Where: Donald E. Stephens Convention Center, Rosemont, IL
Dates: August 21-24 (it's late this year, and the weekend RIGHT before classes begin. Thanks, guys.)
Chicago Comic Con has been my yearly convention, but I'm willing to forego it in order to go to Dragon Con, if I can afford it and get down there in time after teaching on Friday. Weekend tickets are $90, and I will be staying at my parents' house (per usual). Gas to Chicago (if I'm not there already) is about $30
Base Cost: $90- 120

Cosplay Ideas

1. Spoiler (Though I may switch her with Rogue for C2E2)

2. Riven


Con #3, Possibility 2: Dragon Con

Where: Atlanta, GA
Dates: August 29- September 1
I want to go to Dragon Con so badly. I just don't know if I'll be able to afford it--I'm not paid between June and September 16th, which would make things hard. Still, I really want to try to make this happen. I'd use the same costumes for Dragon Con as I would for Chicago Comic Con. Dragon Con costs between $85 and $100, depending on when you get tickets. I would expect to drop another $60 on my share of gas and $200 on my share of the hotel room. 
Base Cost (Estimate): $305


Con #4: Chicago TARDIS

Where: Westin Lombard Yorktown Center
Dates: November 28-30
I had so much fun last year that I just had to make plans to go again. I also have a few people coming to Chicago TARDIS with me this time, and I'm really excited to share the time with them that holiday weekend. Tickets aren't on sale yet, but it was $50 for last year. I would be driving to and from the con on Saturday and (maybe) Sunday. Travel costs from my parents' (it's the weekend after Thanksgiving) would be negligible. 
Base Costs: $50

Cosplay Ideas

1. Member of the Sibylline Sisterhood


Total Base Con Costs (With Chicago Comic Con): $353-383
Total Base Con Costs (With Dragon Con): $568

And that, my friends, is why it's important to budget and stay ahead of things. This doesn't even include costume costs, food/drink, or spending money at the con.I plan to chronicle my C2E2 costumes very closely, including all the costs of making costumes for you beginning cosplayers out there. So keep an eye out for that around March, and I'll update some of these costs to reflect those costs.

Hopefully this is helpful for those of you who plan to develop a yearly con schedule (with or without cosplaying). Part of my goals for this next year is to be more responsible financially, and this my start. 

Until next time...

Friday, November 22, 2013

Tips for Cosplaying (While Broke)

I love to cosplay. I love making costumes, fashioning props, and showing off all my hard work. I love being the characters I adore, even if it's just for eight hours in a crowded convention hall.

I'm also a graduate student, which means I'm broke.

Cosplay is an expensive hobby. Whether you're making your own costumes and props from scratch, or buying some or all of a costume, it can certainly take its toll on your wallet. I've been cosplaying for a few years now, and while I'm nowhere near the level of some of the elite cosplayers, I'm comfortable enough in the cosplay world to give some hints on how you can keep your cosplay costs down. Or at least manageable.


1. Plan in advance.

An essential part of keeping your cosplay costs down is setting a budget for your costume. I usually go to two big cons a year, and I will ideally have one new costume for each convention. This means that I have roughly half a year to plan. The planning includes figuring out what kind of materials I need to buy, and then picking them up over a period of time. It allows me to spread out my spending, and to take advantage of different sales. I'm able to buy almost everything I need for a costume at a greatly reduced price, while I wouldn't be able to do this if I didn't plan so far ahead. Shopping at sales also allows you to stock up on notions and thread, which can be pricey if you have to buy them at full price.

2. Be realistic about your costume.

Do you have a budget of $40 for your costume? If you want to keep to that budget, you'll have to carefully choose which character you're going to cosplay. You'll probably be limited to characters with basic cloth fabrics--cotton blends and the like (but whatever you do, stay away from broadcloth. It's cheap, but it never looks "right"). Incorporating silks, satin, or anything approximating armor will most likely send you way over budget. If you want to include a large prop, you can expect to spend at least $20 on that alone, once you add it all up (foam or wood, glue, paints, etc.)

You should also keep in mind your skill set. If you're working on a tight budget, it may not be wise to try out new methods, materials or to work with new fabrics. Wait until you're comfortable with new approaches, or have enough money to use as a safety net. You don't want to accidentally mess something up and "lose" the money you invested in that material.

3. Work with what you have.

This works the best if you're cosplaying a video game, TV, or movie character who wears normal clothes (or something close). I broke my first rule and had two new cosplays for Chicago Comic Con this past August. I was able to make my second costume for under $20.00, though, since I was Zoey from Left 4 Dead. All I had to do was buy the red track jacket ($4 at the thrift store), toy shotgun ($10), and make the med kit (about $4). The rest of the costume--jeans, white shirt, and shoes--were in my closet. Also, if you have a cool replica prop you can sometimes make yourself the rest of the costume without breaking the bank. A friend of mine had a Master Sword and Hylian Shield replica. It wasn't too costly to get the fabric to make Link's costume from Ocarina of Time.

4. "Recycle" pieces.

Sometimes you have pants, a coat, a robe, or a shirt that you can use for multiple costumes. This really helps to keep your costume on budget. One of the best pieces to recycle, though, is a wig. A wig is a very important part of a costume. It's hard to really pull a character off if you don't have the right hair. Some people can get away with it sometimes, but I'm definitely not one of those people--my hair is a curly, frizzy, unruly mess. The good thing about wigs, though, is that they're investment pieces. I have nice wigs that I use for different costumes, and sometimes I plan costumes based on what wigs I have. $30-$40 on a wig can put a dent in your bank account, but if you can use it for three or four different costumes it could be worth it. Make sure to get a nice wig, though. I prefer Arda Wigs.

5. Invest the time.

So you can't afford worbla or sintra, or to make your own molds. But you can afford Sculpey, cardboard, foam board (and paperclay), and craft foam. If you study up on the material you can afford, and take your time to meticulously and carefully craft your pieces, you can make the cheaper materials look as good (or at least nearly as good) as the pricier materials. Sometimes this takes practice, though, so before you try to make a large sword or full armor, try out a character that has a smaller weapon or pieces of armor.

6. Participate in costume swaps.

Do you want to wear a new costume, but you don't have any money? If you and a friend are the same size (or near enough that it doesn't matter), and both have old costumes lying around, you can trade costumes and satisfy your desire to be a new character without spending a dime. It's fun to try new things without being locked into it. For example, I'm not that invested in anime, and I would probably never spend the money required to make the perfect anime character costume. But there are definitely characters I like and would like to cosplay--and some of my friends have these costumes already made. So I'll go as Motoko Kusanagi and she'll be Dove for the day. It's perfect!

I hope you all find this list helpful. I think that these tips can be helpful even if you aren't pinching pennies to create your costumes. Let me know what you think in the comments :). And check out the weekly blog series on cosplay that I'm writing for Junkies Nation. Weekly Cos-Day features some of the best cosplays found on the internet and submitted to my e-mail (amandab@rerollz.com). At the end of each Weekly Cos-day is a link to a cosplay tutorial. You can see the first two editions here and here

Monday, November 11, 2013

How to Turn Your Little Brother Into Ash Ketchum (Or Make Your Own Sewing Pattern)

Also, how to create your own patterns for costumes! Which may be more useful for some of you.

The first step for turning your brother into Ash Ketchum is to buy him an Ash hat during Chicago Comic Con, but the first step to creating your own costume pattern by scratch is to snatch all the free newspapers from your student union. Or get yourself a newspaper through some more legitimate means. You really only need one newspaper. I went a little overboard because my brother is abnormally tall.

I'M 5'10" DAMMIT.
I then got my brother's measurements--across the chest, from the underarm to the hip, neck to shoulder, end of the shoulder to where you want the armpit to hit, and from the shoulder to the hip.

Then I searched online for patterns for button-down shirts. I wanted to see what the collar and arm holes looked like, but I didn't want to copy it exactly because the only free patterns I could find were for women. So I adjusted things a little bit in my head, and began to sketch the back and front of the shirt on the newspaper. Each of these are only half of the shirt. So you have one of the front pieces and half of the back piece. Don't worry, it's still all under control.


Use your cutting mat to measure the distance from the neck to the shoulder, and mark that across the top. Then sketch in the length from the shoulder to the armpit. Following that, measure from the armpit to the waistline. Basically, it looks like this:


You can use these points to sketch in the neck and the armholes. These will be curved lines, but you want your shoulder and side seams to be straight lines.

This is your front piece. Your back piece will be exactly the same except that the neck hole will be much, much shallower.

I don't have a picture of this step either (I suck) but then you measure how long you want the sleeve to be. You mark this length for each side of the sleeve (also determine the width and cut your pattern to be that wide, plus the seam allowance). The top of the pattern will need to be arched to have enough room for the roundness of the shoulder. At least, that's why I think there's an arch. Dammit, Jim, I'm a gamer, not a seamstress! Also, I'm a Trekker.

NO! BAD KITTEH!
Here's a picture of my cat. Because reasons.


The far piece is the front pattern. The middle piece is the back pattern. You lay it out so that the center is on a fold of the fabric, so it opens out to be the whole back. The near piece, of course, is the sleeve.

Now I don't have pictures do to a total walk though, but here are a few in-progress pictures.

Adding the sleeves to the "vest" of the combined fronts and back.

The basic piece of the shirt. 

Added the yellow trim and now hemming the opening of the shirt.

And here's my brother wearing the costume! And that's how you turn your little brother into Ash Ketchum.


Have a nice night, guys!

Tuesday, November 5, 2013

Some Halloween Goodies!

Hi everybody!

Halloween is pretty much my favorite holiday, and I'm not quite sure why. I think it may just be a nerd thing. I love the decorations, I love dressing up, I love horror movies and shows, and I even love the gimmicky candy. I'm ready for it to be Halloween in the middle of September, and I usually spend the entire month preparing for it. I watch everything Halloween-y I can get to on TV, including those ridiculous real hauntings shows. I just eat it all up.


This year, I spent a lot of time making my Halloween costume. I also made part of my boyfriend's costume (he was supposed to be Splinter, but he didn't bother to get himself a mask or cane or anything, so he ended up just being a dude in a robe). I made the shirt for my brother's Ash Ketchum costume, too.

Nerdy people in my nerdy bedroom.

I made my armor out of craft foam, and connected the straps with round velcro stickers. I made my helmet with an adjusted version of this cardboard helmet tutorial. I used cardboard and craft foam, then filled it with papier mache and wood filler. Using the craft foam may have been a mistake--I think the weight of the other products made it deform a bit as I was building it--but I included it because I thought it would be more comfortable. I will probably go back and re-do all the armor with something like sintra if I choose to ever wear it to a con, since I don't really like how the craft foam turned out.

Here are a few in-progress pictures:

This is the original helmet base, which didn't have any cardboard. 


And here are some of the armor pieces, in their flat foam form.


Here's the helmet base I ended up using (it had some added cardboard to help it keep the shape and a full ...flap?) with the papier mache built up. I filled in all those spaces with food filler and sanded it down when I was done. 


Here are all my armor pieces before they were spray painted. I painted them with 3 layers of acrylic gesso so that the paint would stick correctly. I think I might just do two layers next time, though, since the armor got a little crunchy...


And here they are after 2-3 layers of paint


For the fabric pieces, I sewed my cape and sash myself. I bought the tights and leotard from We Love Fine, since I don't have the skill set for those type of pieces yet, but I added velcro to the shoulders of the leotard in order to secure the cape and the shoulder armor. 

And here are some pictures of the final product! They were taken by my boyfriend's sister, and you can see her awesome photography pages here and here


Overall, I was pleased with it as a Halloween costume, but I'd want to fix a LOT of it before I wore it to a con. A lot of people seem to like it, though, which makes me feel like I'm being a little to critical of myself. But that's how you grow, right?

Crafty Little Monster's Vanessa did a blog post on homemade Halloween costumes, with an interview with me! You should seriously check it out! You can also see Brook from Adventure is Afoot's adorable Wall*E costume! I really should see that movie sometime...

I was going to show you some more stuff on my brother's Ash Ketchum costume, but then I realized I took a bunch of in-progress pictures--so I will just make that a post of its own! For now, though, you can see the awesome pumpkins I made. Unfortunately, I didn't get a lit picture of the jack-o-lantern, but you'll easily get the idea.

Zero

Walking Dead Pumpkin

And I will leave you with this tonight:


Some geeks never change...

ALSO IF YOU CAN FOLLOW THIS LINK AND THIS LINK AND VOTE FOR MY COSTUME IN THESE CONTESTS I'D BE FOREVER AND EVER GRATEFUL!

Monday, August 12, 2013

Chicago Comic Con: Sunday Recap


I got to Chicago Comic Con early on Sunday--I was there only minutes after the doors opened for non-VIP ticket holders. I had the Jason David Frank meet and greet at 11am, but I went over to Wil Wheaton's booth to see when he was signing autographs for the day. I was hoping to get my Wesley Crusher bobble-head signed before the end of the Con, and I wasn't sure how good my chances were going to be. Luckily, Wil Wheaton was scheduled to sign at 10:30 and, though he was a little late, I got my bobblehead signed in plenty of time to head to the meet-and-greet. Meeting Wil Wheaton was great--he was so nice. We had a great talk about some of his recent posts, where he was really thoughtful and caring, and he was really excited to see the bobble head. He hadn't seen one out of the box before, so he took a bunch of pictures of it. Basically, Wil Wheaton is amazing. My experience meeting him was everything I could have hoped for out of those couple of minutes.


I guess I was completely spoiled with celebrity/guest interactions on Sunday, because the meet and greet with Jason David Frank was also excellent. He's the type of person that makes you glad to have idolized him as a child (same with Wil Wheaton). He's outgoing, friendly, and really appreciative of his fans. He took every question seriously, gave long responses, and said he'd sign anything and everything we brought--even though I'm pretty sure it only said he'd sign one thing when we bought the tickets. He told us a bunch of cool stories about his Power Ranger days, his martial arts career, and his life in general. We then took individual photos with him, and he told me that he liked my Green Ranger dress and wanted to get one for his wife. The meet and greet ended with a group photo, where I was lost somewhere in the back. But still! It was a great time! He was also a great person to follow on Twitter and Instagram during the con: he put up tons of pictures, videos, and updates on what he was doing and fans/other guests he was meeting. He was also constantly thanking the people who helped out in the con and his fans.


He signed Saba and the lithograph for me!
I spent the rest of the con spending money and taking cosplay pictures. I tried to go to the Phelps Twins panel, but it was in a small room so it was packed. I also picked up my Nightwing sketch from Jason Metcalf. I'm not going to post the picture, but I thought I'd let you know how amazing and great it is. I'm going to shift around my art collection and hang it right above my desk. I also commissioned a couple of sketch cards--one of Larfleeze and the other of Dex-Starr (I believe the artist was Gregg Paulsen, but I've misplaced the card). It was funny when I was requesting them. He asked me who they were, and I told him Larfleeze was the only Orange Lantern, and then he asked who the second one was, again. When I said Dex-Starr, he went to write it down and then paused, looked up, and asked me "...is that the cat?" I said yes, and he said "Great!" When I picked up the cards, he said he was really excited because he loved to draw cats.

I left about half an hour before the Con ended, but I had a great time this year. I loved my entire three days there, even though I didn't get into two panels I was interested in. I can't wait for next year, even though I think I have come down with the Con Plague. At least I have Chicago Tardis and C2E2 to hold me over until next year, though. I've already started planning cosplays in my head for all three cons!


Read my Saturday recap HERE

Read my Friday recap HERE

Chicago Comic Con: Saturday Recap

I was hoping to get this up last night, but I was exhausted after the Con on Saturday. I didn't get back until 10:15, and then I needed to shower and get to bed so I could go to sleep and get up early today. I also struggled with not having a lot of pictures to put in this post, since I forgot my camera at home! My brother sent me some pictures via text, but I can't figure out how to get them to my computer. Weirdly enough.

On Saturday, I woke up about an hour and fifteen minutes before I wanted to leave for the Con--and actually left about forty minutes after I wanted to leave. My costume had several pieces to it, all of which I made or altered from existing pieces. My hair and make-up for the cosplay provided a little bit of a problem. My biggest issue was the fact that I couldn't find my wig cap, and couldn't get my wig on without it. I have really long, thick, curly hair--about to my mid-back. So after a while of struggling, I improvised and used a new pair of pantyhose. With my hair properly contained, I finished up my makeup (once again, using Espionage Cosmetics products), and left for the con!


We got there just in time to catch John Barrowman's panel, which was hilarious. Barrowman is so energetic and enthusiastic that a panel with him is bound to be the highlight of your day. Everyone was entertained--even my brother, who didn't know who Barrowman was. I'm sure others who were unfamiliar with his work felt the same way. I was a fan of Barrowman's before the panel, but I appreciate him so much more now that I've had the opportunity to sit and listen to him (as himself) for over an hour. This was probably my favorite panel this weekend--except, maybe, for Wil Wheaton's panel.

After the panel, I hit the con floor with my brother, my boyfriend's sister (who was in a Steampunk Catwoman costume), and her friend. We were stopped for a TON of pictures--I was insanely flattered! Even though I didn't get to do much shopping yesterday (which is alright, because I more than made up for it on Sunday). I did get a little bit of snark from one guy when it was just me and my brother (who was distracted by an anime booth). He said:  "Nice costume, but Harley Quinn? Didn't you know a villain that isn't so overexposed?"

I responded: "Well, I wanted to do Talia al Ghul or Jane Doe, but I wasn't sure how to translate it to steampunk in a way that would be recognizable. Especially since this is the first really complicated cosplay that I've ever attempted."

He apologized and walked away. I know my DC Comics, boys, don't worry.

After eating, I went to the Warehouse 13 panel in order to wait to see Jon Bernthal (Shane from The Walking Dead) and Norman Reedus. I have been interested in watching Warehouse 13, so I wanted to get a hint of what the show was all about: plot-wise and fandom-wise. Wondering what I thought? I have the first episode ready to go on Netflix. That should be enough of an answer. John Bernthal and Norman Reedus were both interesting, but not quite as enthusiastic as Barrowman was (in all fairness, it's probably not even possible). I'm interested in seeing Bernthal's new TV show, a period noir piece called Lost Angels. This is my third year in a row seeing Norman Reedus, so I have heard most of what he said before. He was also onstage only for about ten or fifteen minutes.

The end of the Bernthal/Reedus panel was also my most disappointing moment at the Con this year. The Con page and schedule both say:

"Seating for panels is strictly limited and available on a first served basis. We do not clear all panel rooms unless you are seated in a section that is marked with a sign at the end of the row reading 'ROW WILL BE CLEARED AT THE END OF EACH PANEL'."

I was sad that Chicago Comic Con was going to take on such a SDCC-quality, but I was willing to be flexible. Knowing that I wanted to see the Firefly panel following the Reedus appearance, I went to to the earlier panels thinking we'd be allowed to stay--I was somewhat interested in seeing them and I would be able to see the Firefly gang (Morena Baccarin, Summer Glau and Alan Tudyk). Without announcing that they were clearing the room beforehand, they cleared the panel room at the end of Reedus's panel. The line outside for Firefly was so long that we weren't able to get into the panel after leaving the room.

Let me be straight--I prefer the Clear-The-Panel-Room strategy, and I think it's the best way to run a Con (when it's logistically possible). I think that it sucks to wait in line for an hour (or hours) and not make it into a panel because people aren't leaving the room. I just think that if you're going to announce that you're no longer following that practice, you shouldn't decide to clear the room without announcing it beforehand. I saw Bernthal last year. I saw Reedus in 2011 and 2012. I didn't need to see them again at the expense of seeing an awesome panel with people I've never seen before from a show that I love. If I had known, I would have been in that line, not inside that room.

Since we couldn't see the Firefly panel, we wandered around the Con until the costume contest was about to start. During this time, I commissioned a Nightwing sketch from Jason Metcalf. I'll let you know how it turned out in my Sunday recap ;).

We went up for the cosplay contest, registered, and then waited in line for our turn on stage for about two and a half hours. Everything was awesome and I had fun the entire time, even though my feet and back were killing me after standing for that long. The judges and the emcee were great, and the cosplayers were all having fun. I liked how Jarrett "The Defuser" Crippen set up the walk to the stage: the cosplayers wove through the aisles, striking poses on several Xs so that the audience members could take photos. As each cosplayer or cosplay group crossed the stage, the line would shift up and each group would move to the next X. It was pretty awesome. I can't wait to see the video of the contest! I will put up a link here for anyone who's interested! Everyone who participated did a great job, and everyone who won totally deserved it! I think that after this year's showing, Wizard World is going to have to start awarding 1st, 2nd, and 3rd places for each category! The competition is fierce.

Anyway, the contest was done around 9:15, but we had to scoot out a couple minutes early because the girls I carpooled with had to get somewhere. I missed the announcement of Best in Show--if anyone can fill me in, that would be great!

Well, that was everything for the day! Once again, I'll leave you with some cosplay photos (taken by my brother, who had a camera)! Now it's time to watch the first episode of Warehouse 13 before I pass out.


Read my Friday recap HERE

Read my Sunday recap HERE

Saturday, August 10, 2013

Chicago Comic Con: Friday Recap

Hey everyone!

I spent the entire day today at Chicago Comic Con--from opening to close! Okay, so that's 12pm to 7pm, but it's still most of my day (especially with the hour commute).

My day began with hair and make-up. My cosplay for the day was Zoe from Left 4 Dead--one of my favorite video games. I absolutely love Left 4 Dead--it's my go-to game when I just want to hang out with other gamers. I straightened some of my hair, and then did my make-up with products from my favorite geeky brand, Espionage Cosmetics. (The colors I used were Not Today, Guild Romance, Mrs. Reynolds, and Nerd Rage. Is there anything better than that?

Here's the end result of everything! You can see my paint job on the shotgun here, and I also made my First Aid kit from scratch.


Once I was done, my brother and I drove down to Chicago Comic Con. Parking was in a different spot from last year (which was momentarily confusing), but we found parking with only a little difficulty. Getting in to the con didn't take more than twenty minutes, though I was a little jealous of those who didn't order and print tickets online--the line to buy tickets at the Con was non-existent. With admission we got a really nice variant cover of The Walking Dead, which I plan to get signed by the artist.

I was planning to go to the Dead Fans Walking panel, but I was immediately distracted by the retail floor. And missed it. If you went, let me know how it was! I did attend part of the 50th Anniversary Doctor Who Celebration, where I managed to surprise myself with how much I knew about Classic Who. I always forget that the first several doctors didn't have full "seasons" of television, like we do in the States, so I feel like I've missed a lot. Their number of episodes, though, are pretty small--not even close to the series lengths of the new Doctors. I was hoping Barrowman would show up for a moment, but if he did I missed it. 

I spent a good amount of time around the Sugar Gamers booth. I kept coming back to play Injustice, which they had set up through the PS3. I won all my matches, which is incredible as I haven't played it before and I tend to stay away from fighting games. I think I have to buy it, though--I had a blast. I'm looking forward to going to some of the Sugar Gamers events--they are a group founded in order to foster a community for girl gamers and geeks in Chicago. You should definitely click the link above and check them out. The video below is the group's mission statement, from its founder.


The Wil Wheaton panel was great. He's always great to listen to, and always manages to bring the perfect level of sincerity and humor. I was a little worried that we wouldn't get in, since Wizard World has stopped emptying rooms after panels (it looked like it was getting close to capacity for the Stan Lee panel, which I skipped because I'm more of a DC fan). There was more than enough room for everyone, even though there were tons of people at the panel.
What would a con be without grainy/blurry pictures of panels and the ultimate decision
just to take crappy projector pictures?
Before Wil Wheaton showed up, Five Year Mission played some songs. I really enjoy them--they're a band that writes and plays songs based on TOS episodes. You can check them out here. If you're at the Con and you want to check them out, they're playing again Saturday at 2:30 and Sunday at 10:30 on the Cosplay Stage.

Five Year Mission performing in front of Five Year Mission performing
in front of Five Year Mission!
Besides that, I spent tons of money today on a bunch of awesome stuff. Here's my haul--once again, I spent a lot of time in Artist Alley. Tomorrow's back to the Vendor's floor, though. I saw an excellent Captain Marvel dress that I need.

Everything I bought today.
My favorite piece, by the artist of the covers of the A Game of Thrones comics.
Obligatory short of the comics I bought today. 
Finally, I'll leave you with a collage of the cosplay photos I took today! More tomorrow!

Read my Saturday recap HERE

Read my Sunday recap HERE

Tuesday, June 18, 2013

Con Prep: Painting Props

The costume I have planned for the Friday of Chicago Comic Con requires a shotgun. I bought said toy shotgun at my local Gordman's the other day (yeah, who'dve thought?), and today I went to work making the $12.00 toy look...well...better.


Here's a picture of the original end of the gun. You can see the wood-grain texture, but only barely. It looks like a cheap toy.


Here's the shotgun from further away. Plastic-y!

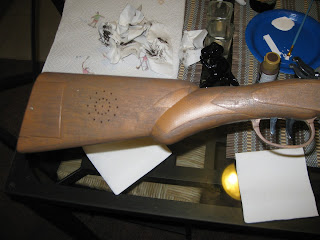
I brought out the wood grain and darkened the plastic using the technique highlighted by the amazing Jen Yates in this blog entry (btw, if you don't read Epbot, you're missing out on EVERYTHING). Jen brings out the texture by painting the plastic with a darker shade of the color, and then wiping the paint off. This leaves the dark pain in the nooks and crannies of the plastic, and makes the thing look great.

I used a brown color called "Dark Chocolate"--but it ended up being too light, so I darkened it with a little bit of black. I also let some spots be more worn and others have a darker build-up, in order to try to replicate the look of an older, often-handled gun. This picture is immediately following the work on the wood-grain. The light spot is an inlay.


Once I finished with the "wooden" parts of the gun, I pained the inlay gold (I know, this gun is super fancy).

So, here are the "after" pictures! What do you think?

Close-up.
Further away.
Here, you can see the smooth spots I added where you'd hold the gun.
Also, all the essential crafting supplies (read: hard cider)
Here's a hint as to what my costume is going to be! If you have a guess, leave a comment! :)

Hint: Think "video game"