Tuesday, August 28, 2012

Etsy Tuesday: Lord of the Rings

This week's Etsy Tuesday post is in honor of the Bag End Silver Locket necklace I ordered a few weeks ago from the Enchanted Leaves store on Etsy. It came in the mail promptly, it's well-made, and I absolutely love it! I wear it several times a week, and I've developed this awful habit of clicking the locket open and closed when I am thinking. I've gotten so many compliments on it already! Thank you, Nedda and Aaron! You can also visit them at enchantedleaves.com!

$24.95 USD


Now, onto the traditional Etsy Tuesday round-up!

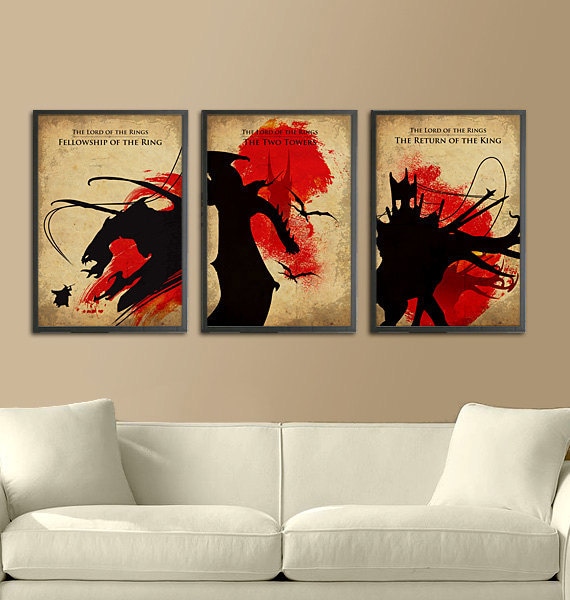
The first thing that caught my eye is this set of posters. It might be because I have been decorating my new apartment for the past week, or it might be my natural love of minimalist designs, but I wish I had these posters instead of my set of three LotR movie posters! They're made by Marcus, of the shop Posterinspired AND I WOULD PUT THEM RIGHT OVER MY BED. Sigh.


$40.00 USD

This next product made me laugh out loud--literally. I'm considering getting one for my car as soon as I get my paycheck (whenever it decides to come). It's pretty inexpensive, and I couple probably put it places other than my car if the fancy struck me (the description mentions laptops). It was made by animevinyl, owner of the shop of the same name.

$8.00 USD

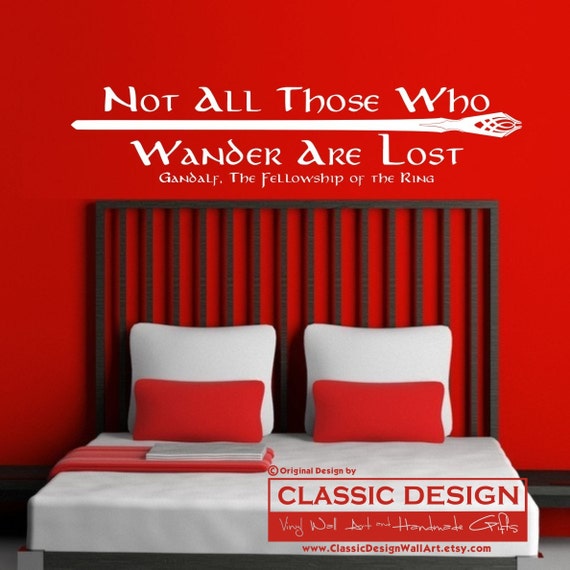
I was actually going to buy this next item, until I got to my apartment and realized the walls are finished with a tactile design--so it just wouldn't work. I was going to hang my three LotR posters under it. It was going to look completely awesome. Trust me. This, along with plenty of other awesome decals, is made by Tressa M. Hopkinson of the shop Classic Design Wall Art. Seriously, I'm crushed that I can't put this up in my apartment.

$29.00 USD


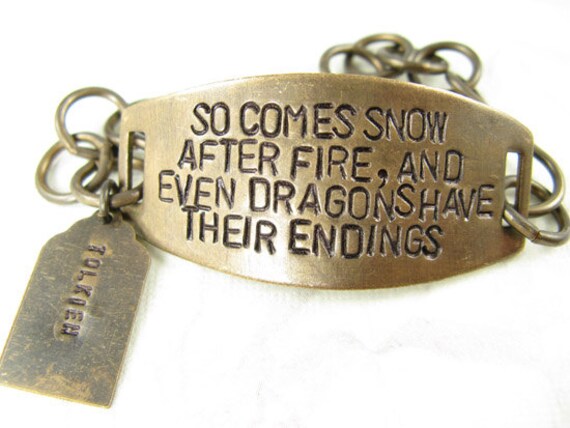
This next one may be cheating a little--it's a Hobbit quote, not a Lord of the Rings quote--but I had to include it. This is my second favorite dragon quote, after Daenerys Targaryen's "He was no dragon. Fire cannot kill a dragon." It may be my next purchase for myself: it's a nice touch of geek to wear when I'm teaching. It's made by Carla Ekman, owner of the shop Cobweb Corner.
$24.95 USD

That's all for today, everyone! Tomorrow I am going to write a reflection on Red Dead Redemption, which I just finished on Sunday. It's not a review because, face it, the game's over two years old. I'm also hoping to see ParaNorman this weekend, and I'll review that too. Also, I will hopefully post a DIY or tutorial this weekend. But first, there will be my reflections on "Grand Theft Horse" (Thanks, Yahtzee).

Wednesday, August 15, 2012

Chicago Comic Con: 8/10 and 8/11

I was good this week, which means I was a bad blogger. I know I said that I would post my reflection on Chicago Comic Con up earlier this week (Sunday or Monday) and it is now Wednesday. Which, sadly, means my review is incredibly less detailed than I intended it to be. Also, I missed yet ANOTHER week of Etsy Tuesday, and I am sad about it because I am going to use to it also review my two first Etsy purchases. They make me RIDICULOUSLY happy. 

And speaking of ridiculously happy, I spent two out of three days this weekend at Chicago Comic Con, instead of packing for my move. I was so thrilled to go for the second year in a row that even Chicago's horrible traffic couldn't dampen my excitement. Even the line to get in couldn't bring me down. And things only got better when the first thing I saw after walking through the gates was this:

Star Trek Uniforms

Me (and my Batman dress!) next to the Admiral Janeway uniform. 
One of the things I enjoy the most about Chicago Comic Con is the large number of cosplay groups that come. Here is the set-up for the Chicago Division Ghostbusters group.


My biggest issue at Comic Con (and C2E2 in the Spring) is that I spend too much money. Here is my first purchase: a robot ring. I can't wait to wear it to teach!


On the first day, I saw the Sam Trammell panel and the Star Trek Captains panel (William Shatner, Scott Bakula, and Avery Brooks). Sam Trammell was hilarious, and seemed like a great guy. He shared a lot of interesting stories, most of which featured him naked. Unfortunately, my pictures of the panels suck.


The Star Trek Captains panel was alright. I found the moderator to be obnoxious, and so did the panelists (which provided some amusement). However, Shatner and Bakula seemed content to let Brooks answer most of the questions. While Brooks is very intelligent and impressive when he speaks, it really didn't give us a great behind the scenes look. The biggest issue, though, was the more that Brooks spoke, the more the fans asking questions felt like they needed to phrase things to sound more intelligent--and they often failed. 

For Comic Con, I made an Azula costume. However, many things didn't pan out right (this was my first attempt at cosplay), so my costume ended up being more generic fire nation. My fellow geeks seemed to still enjoy it, though, and I was flattered with the number of pictures I was asked for. 


Though I did have an issue with heat--my hands and my feet swelled up like balloons! I had to change out of my costume halfway through, and it took more than a day for the swelling to go away. You can't really tell in this picture, but my hands were two times their normal size. I didn't realize until I went to pay for an ice cream cone and my sister started laughing hysterically. 


Swollen hands :(
My boyfriend's sister (in a steampunk costume) and me.

On Saturday, I saw the Tom Felton panel and the Kevin Sorbo panel. I found Tom Felton to be surprisingly affable, and enjoyed the panel a lot. A little girl asked him if it was fun to film the scene where he turned into a ferret and he responded, "Yes, but it took me MONTHS to get that down." He also spoke very affectionately to his fans, which is always great to see. Kevin Sorbo was great, as always. I got his autograph, which will go above my desk in my new apartment!

My friend is trying to get the autograph he got for his girlfriend to dry... which led to a very interesting sight.
He ended up having to carry it through the con, which  resulted in a lot of stares. He hammed it up.
I enjoy Chicago Comic Con more than C2E2 because I find that its panels are of better quality, and they have great displays. C2E2 seemed more to me like a shopping trip, where you could also pick up autographs (from people you may or may not want autographs from). I still bought a lot of stuff at Chicago Comic Con, though! Here is a picture of my loot!

Everything I bought, my Girl Gamer shirt front-and-center.

All the art I bought for my new apartment!
To end this article, here are a few great cosplay pictures!

I ignore the girls and look at the Bat and the original Batmobile,

An awesome Captain America cosplay! The shield is made from the roof of a car!

I found Carmen Sandiego. And I also happened to find Waldo.
Gondor Soldier.

Green Arrow!

Doctor Rockso, the Rock and Roll Clown. (He does cocaine.)
Poor Red Shirt. (I got his attention by yelling "Red Shirt!" and my sister  was appalled.)

Finally, this Arkham Asylum Scarcrow is my favorite. I think he was part of the Chicago DC Cosplay group.
If you happen to know any of these cosplayers, let me know so I can properly credit them! I hope you all have a good day! I will be without cable and internet for a little while, so don't expect any updates until the beginning of next week!


Sunday, August 12, 2012

DIY: Dry-Erase Calendar

Hi everyone! I'm fresh from this year's Chicago Comic Con, run by Wizard World. I had an excellent time, and once I get all my pictures uploaded (I had to borrow my mother's camera on Friday, which is slowing me down), I will write a post on it! Hopefully it will be done by Monday. If anyone is interested in some of my thoughts, look at my new Twitter (the link is on the profile section of this blog).

For now, please content yourself with this DIY of a paint sample dry-erase calendar. It was a very easy task, done many times. I made it my own, however, by adding a geeky element. I got the idea from this post by The Aesthetic Writer. As you know, I am moving into a new apartment (in five days! Yikes!), and I thought this would be great above my desk. Since I am a student, I need to be organized. Here is the DIY, in several easy steps.

First, go to your local home improvement store and select several paint samples. You can pick one type of color. I picked several hues of my favorite colors: purple, pink, green and blue.

Second, buy a frame. I bought my 20x24 inch frame and Jo-Ann Fabrics.

Third, cut the paint samples into squares. I chose to include enough squares for four weeks--you may want to do five.


Fourth, lay the squares out in the position you want them. I rearranged them several times, and then secured them with double-sided tape.

Fifth, I cut out a rectangle to sit behind the name of the month, and framed it with a larger rectangle. The small rectangle is scrapbook paper, and the larger one is a large paint sample.


Sixth, I cut out some old-fashioned sci-fi ray guns, using scrapbook paper.


Seventh, because I can't resist a touch of girliness, I cut out a couple flowers, stems and leaves to place on the top with the ray guns.

Eighth, I added white label stickers from the office supply aisle at the grocery store to write dates on.

Ninth, I added letter stickers to designate the date of the week (see below).

And here is the final product!


Here's a closer view of the top half.


And, finally, a close-up of my favorite part--the ray gun/flower decorations!


I hope you all had a good weekend so far (mine was hit and miss--I had a great time at Comic Con, but I also had to put my dog to sleep--I'm mostly writing this because I can't bring myself to go to bed). Look for my post on Chicago Comic Con in a day or two. Also, I'm looking to redesign some of this blog--creating a new banner and a watermark for my pictures. Maybe even a background, who knows. Finally, feel free to look me up on my new Twitter page! I love meeting my fellow geeks on the internet (though in real life, I'm the most socially awkward person you'll ever meet).

Wednesday, August 1, 2012

DIY: String-tied Tank Top

Welcome to my first DIY! Here, I will show you how to make a string-tied tank top.

I began with a t-shirt I purchased from Threadless, which is one of my favorite websites to order t-shirts from. They print their designs on soft shirts which are easy to work with if you want to alter them. The t-shirt I used is found here. I love it because it's a subtle geeky reference--and freakin' adorable.


I always use a men's t-shirt to alter, mostly because I like my shirts and tank-tops to flow. This is a size large. I've bolded the steps of this tutorial for easy reference!

First, I laid the shirt down flat.


Second, I turned the shirt inside out.

Third, I cut off the sleeves just inside the seams.

Fourth, I put the t-shirt on, and determined the position I wanted for the top of the tank top. I marked this spot with a straight pin.


 Fifth, I cut along a ruler, giving myself about an inch for the hem at the top of the shirt.


Sixth, I determined where I wanted the hem on the back of the shirt to be, and cut it the same way I cut the front of the shirt.

Seventh, I pinned the shirt to prepare for sewing.


t

Eighth, I threaded the top of the shirt with dark blue string I bought at Jo-Ann Fabric.


From there, I pilled on the t-shirt, and tied the strings to finish off the top! I love how it adds rouching to the top of the shirt--a nice, girly touch!

Ta-da! If you want to pin this or use these pictures in a post of your own, please link back to my blog! If you make your own string-tied tank, send me a picture! I hope you enjoyed my first tutorial!

Follow These Links for More T-Shirt Alterations: